TitlePages
TitlePages is a Multiple Document Interface (MDI) word processor incorporated into planEASe to enable you to process and print documents that use the same Page Setup as your planEASe Reports and Graphs. Thus you may produce planEASe documents, reports and graphs bearing consecutive page numbers with the same appearance so that the entire presentation package appears to have been produced by the same software (as indeed it has).
 Formatting
TitlePages is capable of
bold,
italic, and
underlined text.
These effects are implemented by pressing the B, I, and U buttons in the toolbar,
or pressing Control-B, Control-I or Control-U while typing. If a section of text
is highlighted (selected) when you do this, the selected effect is applied to the
text. You may use superscripts or subscripts by selecting the text, pulling down
Format/Character, and selecting the appropriate treatment and font size.
You may also select different fonts either by selecting text and choosing the font
from the font list in the toolbar, or by choosing the font without selecting text,
which uses the selected font for all following text (until you choose another font).
You may also select text color by selecting the text and pulling down
Format/Text Color.
A unique aspect of this word processor is that Page Setup (margins, base font,
back color, and font color) is controlled by your Page Setup settings in planEASe —
your printed page appearance is the same as all other planEASe reports and graphs
you print with this Page Setup. If you have chosen to number your pages and/or
use the other page footer options, your printed pages will use your settings (and
page numbers) when you print. While the page presentation on screen recognizes the
Page Setup margins, it is not feasible to show the top title box, text surround
box, and footer information on screen, although they are added to the printed page.
Communicating
TitlePages can open and save files in four formats:
- planEASe (proprietary; *.txp)
- Rich Text Format (most word processors; *.rtf)
- HTML (web pages; *.htm)
- Text (editors such as Notepad; *.txt)
The default is the planEASe *.txp format which has the advantage of retaining the
Title and Subtitle text for the Title Box at the planEASe page top, but *.rtf files
can be read (and written) by other word processors such as Microsoft Word and WordPerfect.
HTML files are used by websites, so you can use this format to publish to your
website (or read/edit others' website pages). Text files (*.txt) will not retain
your formatting (bold/italic/underline) information, but in general the other file
types will. You may import and export to other word processors and editors by using
the Windows Clipboard. Cut/copy selected text with
Edit/Cut (Ctrl-X) or
Edit/Copy (Ctrl-C). Paste anything on the Clipboard into TitlePages with
Edit/Paste (Ctrl-V).
MDI Interface
Due to its MDI capability,
TitlePages can open more than one document at
a time. The open documents are listed in the
Window menu, which is where
you may arrange and/or switch between the open documents. To close a single document,
access
File/Close or click the button at the top right of the document window.
When
TitlePages is opened (by requesting
Reports/TitlePages at the
Assumptions Edit Screen), the first document (the TitlePages for the current Assumption
Set) is automatically opened for your editing. You may then open additional documents
by pulling down
File/Open. When you are finished with a document you should
pull down
File/Close. Pulling down
File/Exit or pressing the
Exit
button located at the screen bottom right, or pressing the Escape key when in any
document, will close
all documents (including the current TitlePages) and
return to the Assumption Edit Screen, just like all other report functions in planEASe.
 Graphics/Images
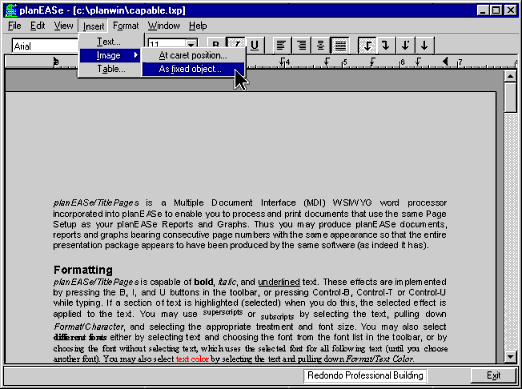
You may insert graphics in TitlePages from a file in either of two ways. The button
here has been inserted at the cursor by pulling down
Insert/Image/At Caret Position
and specifying the file. When a graphic has been placed
At Caret Position,
it is treated as a character in the text stream and cannot be sized. TitlePages
reads TIFF (*.tif), Bitmap (*.bmp), Graphics Image Format (*.gif) and Windows Metafile
(*.wmf) graphics.
The second way to insert a graphic from a file is
Insert/Image/As Fixed Object.
Graphics inserted this way first appear at the top left of your screen, and you
may drag them to the desired location by clicking on the graphic (a dotted line frame
appears), depressing the Alt key and dragging it with the mouse. Selecting the graphic,
depressing Alt, and placing your mouse pointer at a corner or mid-border allows
you to size the graphic.
Graphics may be pasted into your document from the Clipboard by pulling down
Edit/Paste
or pressing Ctrl-V.
 Tables
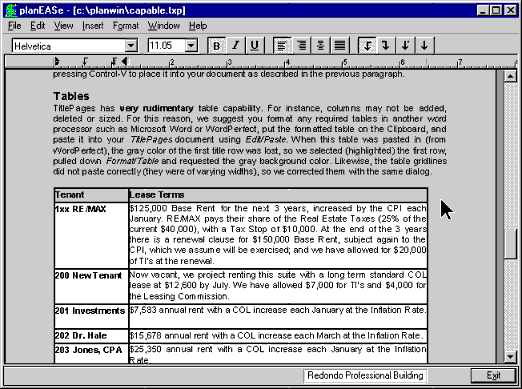
TitlePages has very rudimentary table capability — columns may not be added, deleted
or sized. For this reason, we suggest you format any required tables in another
word processor such as Microsoft Word or WordPerfect, put the formatted table on
the Clipboard, and paste it into your TitlePages document using
Edit/Paste.
Have a question about TitlePages? Ask the
planEASe Support Center
for step-by-step answers drawn from the full video library and manual.