Watermark Dialog
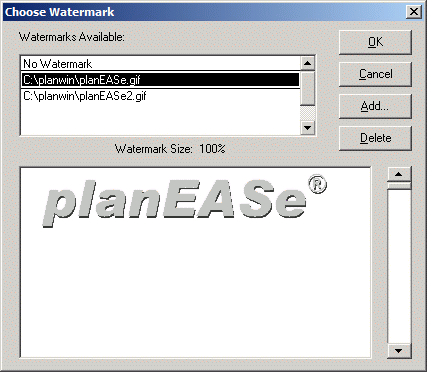
This Dialog allows you to specify a Watermark that will print in the middle of the body of planEASe Reports. You can choose from any Bitmap (*.bmp), Windows Metafile (*.wmf), Tagged Image Format (*.tif), JPEG (*.jpg), or Graphics Interchange Format (*.gif) files. Any chosen Watermark File can be sized to occupy anywhere from the full width of the printed Report to 5% of that width. Watermarks do not show in planEASe Graphs or in reports that are saved as WebPages.
The Watermarks List at the top of the Dialog shows the Graphics you have chosen to be available for use as Watermarks, and a box at the bottom of the Dialog shows a preview of the Graphic you have currently chosen in that list. First in the list is always the No Watermark choice, which, if chosen, eliminates any Watermark from the Reports (and the preview box).
The Background Color of the preview box is set to the background color of the Body chosen in the Page Setup Dialog so that you can see how it meshes with the chosen graphic. The RGB specification for this Body background color is available in the Page Setup Dialog by clicking on the Body Color shown there and then clicking on the Define Custom Color Button in the resulting Color Dialog. Several Graphics programs (such as Photoshop Elements or CorelDraw) will allow you to set the background color of your chosen graphics to match this color specification if you choose to do so.
A Size ScrollBar at the right side of the preview box allows you to set the size of the Watermark that will be shown in the Body of the planEASe Reports. 100% means the Watermark will occupy 100% of the width of the Body. Dragging the ScrollBar down lowers the 100% to the level reflected in the label above the preview box. The size specification is saved with the graphic for future reference, but is not reflected in the watermark preview box. It is, however, reflected in the Page Setup Preview Box.
Four buttons allow you to control Watermark usage:
OK Button selects the currently highlighted graphic in the Watermark List and uses it as the planEASe Watermark for all planEASe Reports, exiting this Dialog and returning to the Page Setup Dialog, where the chosen Watermark is shown in the Body section of the preview). If the No Watermark choice is highlighted when this button is pressed, no watermark will be used.
Cancel Button exits this Dialog, ignoring all work performed here.
Add... Button brings up a File Dialog allowing you to add graphics to the Watermark List. We ship a graphic, planEASe.gif, with planEASe which you can add to the Watermarks List to experiment with this capability.
Delete Button simply deletes the currently highlighted graphic from the Watermark List.