Cash Flow Analysis
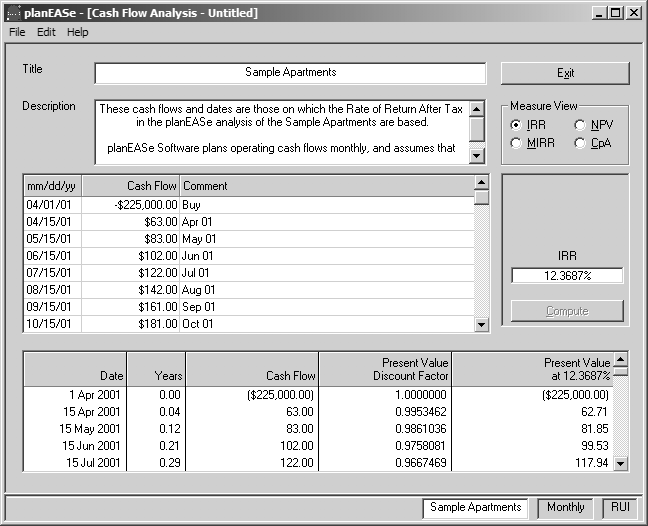
This function allows you to enter (or import from your planEASe Basic Analysis with the File/Import menu option) a cash flow stream together with the dates of receipt or disbursement, and display/report the discounting process used to compute the IRR, MIRR, NPV and/or the CpA resulting from those cash flows. Cash flows you enter or import may be saved and opened in later sessions by using the File/Save and File/Open menu options. Here we see the screen immediately after using File/Import to import the Rate of Return After Tax for the Sample Apartments.
Since this function accepts dates for the cash flows, it’s clear that it is NOT limited to equally spaced cash flows (as are spreadsheet programs and calculators). Because real life investments rarely throw off cash in equally spaced time periods, this is a real convenience (if not a necessity). This is just one of the conveniences in this software versus calculators and/or spreadsheets. Other advantages include easy save and retrieval, comments associated with each cash flow, customization of measures and parameters, verification reports, et cetera.
Cash Flow Entry Enter your cash flows into the Cash Flow Grid at the center of the screen. You must enter them sequentially, row by row, and you may not skip rows. You may enter as many as 200 cash flows. When you are in the Cash Flow Date column (mm/dd/yy), pressing w, m, q, s, a, or y will enter a date of next week (w), next month (m), quarter (q), half year (s), or year (a or y), as measured from the date in the row above the cursor. When you are in the Cash Flow column, entering either the quote mark (") or the apostrophe (') enters the dollar amount from the row above, so constant cash flow streams are easily entered.
If you want to Insert a new Cash Flow in the middle of an existing stream, put the cursor in the row below the row where you want to insert and choose the Edit/Insert Row menu option (or c - I). Delete a row with the Edit/Delete Row menu option (or c - D).
Compute When you enter or change Cash Flows or Dates, the Verification Grid at the bottom of the screen turns gray, signifying that it has not been updated for your edits. You may update the Verification Grid by pressing the Compute Button at any time. Alternatively, if you have few cash flows or a fast machine, you may want to check the Edit/AutoCalc menu option which updates the Verification Grid automatically whenever a Cash Flow Date or Amount is entered or edited.
We do not compute an IRR or an MIRR where the total of the cash flows is negative (you lose money). In such cases, these rates are shown as “Zero or Less”. Likewise, we don’t compute rates of return above 999.9%... such rates are simply shown as “Above 1,000%”. In the incredibly unusual case where multiple positive IRR’s are defined, we report the lowest positive rate.
Measure View For any Cash Flow stream, you may view the IRR, MIRR, NPV or CpA of the stream by clicking the corresponding view. The Discount Rate (NPV), Safe Rate (MIRR), and Reinvestment Rate (MIRR and CpA) can be edited by clicking on the rate (shown in the Compute Button Window below the Measure View Frame).
File/Print Menu Option allows you to print “Verification Reports” for any and all of the computations shown on the screen. Report Commentary is automatically generated to explain the measure being verified, and you may edit the commentary if you want.
File/Save and File/Save As Menu Options allows you to save all the relevant information about the cash flows for retrieval at a later time.
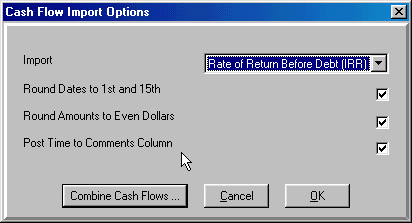
File/Import Menu Option This option allows you to import the cash flows from the planEASe Assumption Set currently being processed into this Cash Flow Analysis function, so that you may produce Verification Reports for these cash flows. Requesting this menu option displays this Cash Flow Import Options dialog box, allowing you to set the following Import Specifications:
Import specifies the particular cash flows that you want to import. The cash flows to be imported correspond to the measure selected, so choosing either Rate of Return Before Tax or Net Present Value Before Tax will import the Cash Flow Before Tax, since both measures are computed based on those cash flows.
Round Dates to 1st and 15th, normally checked, does exactly that. If you uncheck this option, the dates will be set to the corresponding decimal equivalents of the fractional year. Thus a fractional year of.5000 will be set to July 2 rather than July 1.
Round Amounts to Even Dollars, normally checked, does exactly that. If you uncheck this option, the amounts will be shown accurate to the penny.
Post Time to Comments Column, normally checked, controls whether the cash flow comments column is filled with the month and year the cash flow occurs. If you are importing Combined Cash Flows (see the next paragraph), checking this option inserts the Investment Name of the Assumption Set being imported into this column. If you uncheck this option, the comments column is left blank.
Convert to Year-End Cash Flows will be shown if your Acquisition Date is in January and your Holding Period is an even number of years. Normally unchecked, when checked this will post the imported cash flows as annual, occurring at the end of the year. This is useful for comparing with the results of CCIM cases which always start in January, end at year-end, and use antiquated (and incorrect) IRR measure techniques now replaced by the (correct) XIRR and XNPV measures within Microsoft Excel.
Clicking OK imports the requested cash flows, placing them in the Cash Flow Grid, and computing the specified measure. You may import and combine Cash Flows from more than one Assumption Set by choosing the Combine Cash Flows... button at the bottom of this dialog.
When cash flows have been imported, they may be edited, saved, reported, et cetera, just as if you had entered them from scratch.