Development Spending Dialog
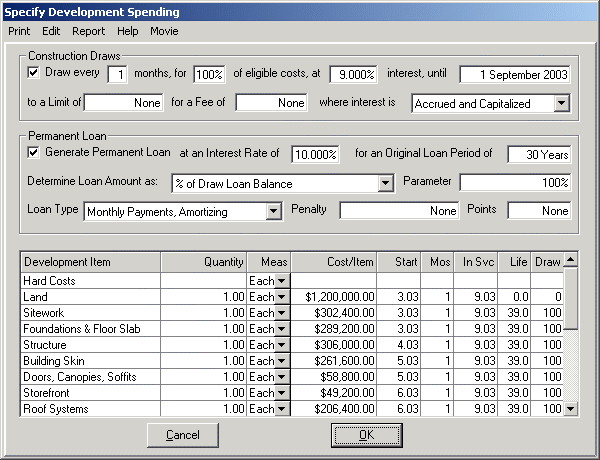
The Development Spending Dialog allows you to enter the specifications for a Development, (accessed by choosing Edit/Development Spending... from the Assumption Edit Screen). When you have completed the entry of information in the Dialog and press the OK Button, planEASe will enter one Development Spending Page for every item (line) you enter in the Dialog grid. If you access Edit/Development Spend- ing... while an Assumption Set containing a Devel- opment Specification is loaded, the Specification as it currently exists in your Assumption Set is recov- ered into this Dialog for your further processing, so you may edit the specified values in the Dialog, or at the Assumption Edit Screen, as you choose. A Development Spending Specification consists of:
! as many Development Spending Pages (abbr: Depr-dev) as you enter in the Development Item Grid ! one Construction Draw Page (abbr: Loan-drw), if specified ! one Permanent Loan Page (abbr: Loan-prm), if specified
When you press the OK button in the Dialog, planEASe removes the previous Development Specification (if any) from your Assumption Set and inserts the specification in the Dialog. If you press the Dialog's Cancel button, the Assumption Set stays as it was prior to your entering the Dialog.
If you check the Draw every checkbox above the grid, planEASe will generate a Construction Draw Page in your Assumption Set according to the instructions you enter here. Once that has been done, you may use Basic, Detail, Sensitivity and Risk Analysis on the Construction Draw Loan as you would with any other loan. If you generate a Construction Draw Loan, it will be inserted as the first loan in your Assumption Set. You cannot enter a Construction Draw Page in any other way. You can, however, edit any of the assumption values shown, once the Page has been generated by the Development Spending Dialog, and the Construction Draws generated in the resulting analysis will correspond to the edited values. Additionally, appropriate assumption values of the Construction Draw may also be varied in Sensitivity and Risk analyses. Sensitivity and Risk Analysis may be conducted with Loan Amount as the chosen Measure. If a Draw Loan has been specified, the Analysis will show the maximum loan balance during the life of the draw loan as the Loan Amount.
If you check the Generate Permanent Loan checkbox above the grid, planEASe will generate a Permanent Loan Page in your Assumption Set according to the instructions you enter here. Once that has been done, you may use Basic, Detail, Sensitivity and Risk Analysis on the Permanent Loan as you would with any other loan. A Permanent Loan is the same as any other planEASe Loan except that you may specify the Loan Amount to be any of several choices relevant to the development process. You cannot enter a Permanent Loan Page in any other way. You can, however, edit any of the assumption values shown, once the Page has been generated by the Development Spending Dialog, and the Permanent Loan generated in the resulting analysis will correspond to the edited values. Additionally, appropriate assumption values of the Permanent Loan may also be varied in Sensitivity and Risk analyses.
Development Item Grid columns are as follows:
! Development Item is the name of the item, such as Signage. The name is used as the Page Title for the Development Spending Page generated for this line. You may use an “&” in front of the name to combine the item with the previous item in the normal planEASe reporting. This will not affect the Project Cost Summary, Bill of Material or Project Cost Schedule Reports, which report one line per item always, ignoring the “&”.
! Quantity is the required number of this item (normally one). The quantity you specify becomes available in the Calculator on the Development Spending Page for that item.
! Meas is the unit of measure for this item (defaulted to Each). When you begin a new development, this column contains Each and SqFt as the available measures. If you want to add another measure (such as Tons, or Feet), just type it in here, and it will become available on all lines. The measure you specify becomes available in the Calculator on the Development Spending Page for the item. To change a measure in the list, select it for an item, and typeover the existing name (the name Each may not be changed). To delete a measure in the list, select it for an item, and use the delete or backspace key to delete all the text of the measure name. The measure will be deleted from the list, and all items using that measure will be changed to use Each. The names Each and SqFt may not be deleted.
! Cost/Item is the cost per unit for the item. The cost you specify becomes available in the Calculator on the Development Spending Page for the item.
! Start is the month and year the item cost begins, entered as a planEASe Date. Dates less than or equal to the Acquisition Date (or equal to or greater than the end of the Holding Period) are not allowed.. Once a Date appears here, you may increase / decrease it by one month by using the + and - keys.
! Mos is the number of months over which to spread the cost of this item (normally one). If more than one, the cost of the item will be spread equally across the number of months requested. Mos values which would cause spending after the end of the Holding Period are not allowed.
! In Svc is the month and year the item is put into service (and depreciation begins), entered as a planEASe Date. Dates less than or equal to the Acquisition Date (or equal to or greater than the end of the Holding Period) are not allowed. Once a Date appears here, you may increase / decrease it by one month by using the + and - keys.
! Life is the depreciable life for the item, typically 39 or 27.5 years. Enter 0 (zero) for non-depreciable items such as land.
! Draw is the percentage of the item cost that applies to the draw percentage, if Generate Draws is checked. For instance, an entry of 90 here for an item costing $100,000 when the draws are specified to be 80% of eligible costs would generate a draw loan of $72,000.
Edit Menu allows you to do several things to the Development Item Grid:
! Cut/Copy/Paste/Insert/Delete Item Row You may click on any item row in the grid and choose Cut/Copy/Insert/Delete Item Row to cut/copy/insert/delete an item row. If you have either copied or cut a row, the Paste Item Row Menu Option is enabled.
! Increase/Shorten Start Dates increases or shortens ALL the dates in the Start column of the grid. Additionally, increasing the start dates will increase the until date in the Draw Loan specification.
! Increase/Shorten In Service Dates increases or shortens ALL the dates in the In Svc column of the grid.
! Change Item to Title changes any Item to a Title. Titles (like Hard Costs and Soft Costs in the examples shipped) allow you to add subtotals to your Project Cost Summary and Bill of Materials Reports. They do NOT appear in the Assumption Page List when you insert your specification into the Assumption Set.
PasteColumn Menu Option is available anytime the cursor is in the Development Item Grid, and allows you to paste an entire column of information from the Windows Clipboard into the Grid beginning in the row where the cursor is located. For example, selecting PasteColumn / Development Item pastes the clipboard data into the Development Item column. If any data is already in that column, planEASe asks if you want to overwrite it. If there are more rows on the Clipboard than in the Grid, additional rows are automatically added. Any unacceptable values on the clipboard are skipped rather than pasted.
Anytime you use the PasteColumn Menu Option planEASe remembers the status of the Grid before pasting, and offers the option to undo the Paste at the Edit / Undo... Menu Option where Undo is followed by the name of the action being undone, such as Edit / Undo Paste Development Item. In addition, the Edit / Insert Row, Delete Row, Cut Row and Paste Row commands are remembered, and can be undone, one at a time, and in reverse order of occurrence.
Report Menu allows you to switch between the Development Spending Specification and the available reports. While being viewed, any report may be printed, saved as a web page, or exported by accessing the appropriate Print Menu choice.
General Tips for planning Development Projects
You may incorporate Land into the Development Item Grid, and use the Draw Column to show that 100% (or less) of the land value is included in the Draw Loan, but that treatment will include the proportionate amount of the draw loan interest in the Construction Period Interest allocated to the assets in the Draw Loan (including Land in this case). Accordingly, this interest amount will be associated with an asset (Land) that is not depreciable, and that amount of interest will not be written off until the sale of the asset (and Land), thereby penalizing the project rate of return. A better (more profitable) treatment of the land acquisition would be to not include it in the Draw Loan and rather, enter a normal planEASe loan for any amount of the land value to be borrowed.