Reimbursements Dialog
Many leased properties, such as Retail and Office investments, involve leases with expense reimbursement provisions. Additionally, Retail leases may well call for Percentage Rent to be paid by one or more tenants. The Reimbursements Dialog allows you to enter the Expense Reimbursements and/or Percentage Rents associated with each lease you enter for the property. This Dialog will only be available (at Edit / Reimbursements) if:
! You have entered one or more leases, and have used the Calculator to specify the SqFt occupied by the lessee, and ! You have entered one or more expenses for the property, and ! You have NOT specified Tenant or Owner representation for the Assumption Set (Price of Property is NOT 1 or 2), and ! You have NOT entered Unit Sales Specifications for the Assumption Set.
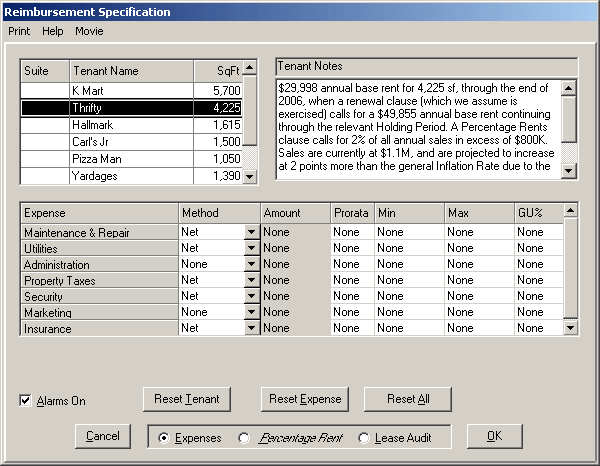
When you click on Edit / Reimbursements, this Reimbursements Dialog appears. The Tenants List at the top left is not editable, but rather allows you to display the Reimbursements and/or Percentage Rent for any of the listed tenants by highlighting the tenant with a mouse click or an arrow key. As you highlight a tenant, any Notes you have entered for that tenant at the Assumption Edit Screen are dis- played in the Tenant Notes window to the right of the Tenant List, and you may edit them there. Any changes you make are posted to the Notes area of the tenant’s first revenue assumption page in the As- sumption Page List when you press the OK button. Pressing the Cancel button cancels any note changes as well as any other changes you have made in the Dialog.
At the center bottom of the Dialog are three view options for you to choose from (Expenses, Percentage Rent, or Lease Audit). These views, which vary the information presented in the lower portion of the Dialog, are described below.
Expenses View On entry to this dialog, or if you choose the Expenses View, the Reimbursement Grid is shown in the lower portion of the Reimbursement Dialog, displaying one line for each expense entered in the Assumption Set, excluding any expenses entered as % of EI expense pages (which are not reimbursable in planEASe). For each expense in the grid, you may specify a reimbursement method (for the tenant highlighted in the Tenant List above) as follows:
! Method allows you to specify the Method of determining the reimbursement of the expense on each line. Your choices are: None - this expense will not be reimbursed. Use this method to eliminate previously planned reimbursement. While the other fields retain their values when you choose None, the next time you enter this Dialog, the values will have been zeroed out. Net - all of this expense will be reimbursed.
$ Stop - all of this expense less the amount entered in the Amount field will be reimbursed. BY Stop - all of this expense less the expense amount in the first lease year will be reimbursed. $ - the amount entered in the Amount field will be reimbursed ! Amount - this amount is used only when the $ Stop or $ method above has been chosen (to remind you of this, the Amount cell background is colored gray and the cell becomes inaccessible when a Method not requiring an amount is chosen). It provides the dollar amount required by these methods. If you enter an amount >=100, it is treated as $/Year. Amounts <100 are treated as $/SqFt/Year. ! Prorata - normally expense reimbursements are allocated on a percentage of space occupied. For instance, a tenant occupying 1,000 RSF in a 10,000 RSF building is allocated 10% of an expense for reimburse- ment, no matter the method. This happens automatically and dynamically within planEASe, without your intervention. If, however, you enter a non-zero percentage in this column, it will override the natural pro- rata percentage. The reimbursed amounts for the other tenants for this expense will not be affected by this override. ! Min - allows you to specify a minimum reimbursement amount for this expense. If you enter an amount >=100, it is treated as $/Year. Amounts <100 are treated as $/SqFt/Year. ! Max - allows you to specify a maximum reimbursement amount for this expense If you enter an amount >=100, it is treated as $/Year. Amounts <100 are treated as $/SqFt/Year. ! GU% - allows you to specify a Gross Up Percentage for this expense. This only affects expenses planned with a positive Expense Variable assumption. Such expenses respond to planned vacancies by varying the variable portion of the expense in accordance with the Property Occupancy rate. An example of such an expense would be Janitorial, where 50% vacancy would cause the expense to be substantially lower due to not having to clean the vacant space. In such a situation, if Janitorial were planned as $100,000 and 75% variable, with only 50% of the space occupied the resulting $62,500 expense would only be reimbursed $31,250. For this reason, some leases allow some or all expenses to be “grossed up” for reimbursement to some specified occupancy level (for example 95%). With a 95% assumption here, Janitorial would be grossed up to $100,000 * 25% + $100,000 * 75% * 95% or $96,250. If the tenants occupying 50% of the space all reimbursed Net, they would reimburse $48,125 of the total instead of $31,250, with the remainder of the $62,500 being paid by the owner. Three buttons appear at the bottom of this view to facilitate mass changes to reimbursement methods and or Gross Up Percentages: ! Reset Tenant sets all expense reimbursement methods for the displayed Tenant to the method chosen for the highlighted expense, regardless of the previous settings. ! Reset Expense sets all expense reimbursement methods for the highlighted expense to the method chosen for the highlighted expense for all Tenants, regardless of the previous settings. ! Reset All sets all expense reimbursement methods for all tenants and all expenses to the method chosen for the highlighted expense, regardless of the previous settings. For example, you may easily set all tenants to Net reimbursements by setting one expense to the Net method and then pressing Reset All. You may set all expense reimbursements for the current Tenant to None by setting one expense for the Tenant to None, and then pressing Reset Tenant. As a special case, if you have highlighted the last column, GU%, the Reset buttons will change the Gross Up Percentage for the current Tenant, Expense, or All tenants and expenses, respectively, rather than changing the Method.
Percentage Rents View If the tenant highlighted in the Tenant List has a Percentage Rent clause entered, and you are looking at the Reimbursement Grid or the Lease Audit Grid,
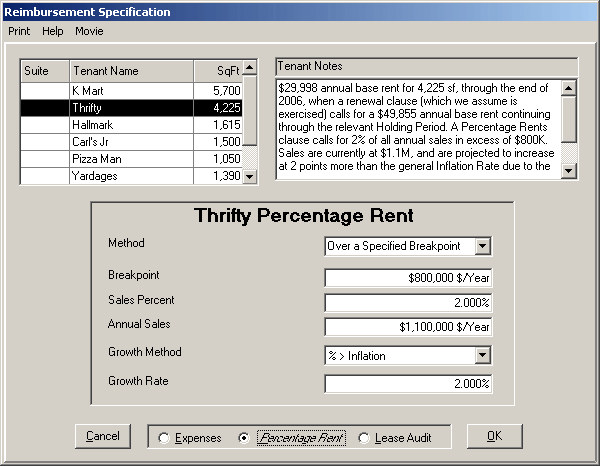
the Percentage Rent caption on the Percentage Rent View option below the Reimbursement Grid will be shown in Italics to alert you to this. Choosing the Percentage Rent View option reveals the Percentage Rent definitions, as shown in the screen at the top of the next page. ! Method allows you to specify the Method of determining the percentage rent. Your choices are: None Eliminates all Percentage Rent calculations for this tenant. Use this method to eliminate previously planned Percentage Rent for a tenant. While the other fields retain their values when you choose None, the next time you enter this Dialog, the values will have been zeroed out. Over a Natural Breakpoint allows you to specify the use of a Natural Breakpoint, which is derived by dividing the Sales Percent into the Base Rent (taken from the First Page and all following Continuation Pages for the Tenant) for the year involved. Thus the Natural Breakpoint will be different whenever the Base Rent changes. Over a Specified Breakpoint allows you to enter a specified Breakpoint in the Breakpoint field. ! Breakpoint is relevant only for the Specified Breakpoint Method, and is expressed as $/SqFt/Year if an amount less than or equal to 2,000 is entered, and $/Year if greater than 2,000. ! Sales Percent is the negotiated percentage of sales to be paid. ! Annual Sales is the expected level of sales for the first lease year, and is expressed as $/SqFt/Year if an amount less than or equal to 2,000 is entered, and $/Year if greater than 2,000. ! Growth Method allows you to link the growth in the Annual Sales to inflation, or not. Your choices are % / Year or % > Inflation. ! Growth Rate allows you to control the Growth Rate of the Annual Sales, according to the Growth Method specified. The example in the screen shot above shows the Percentage Rent provision for Thrifty in the shops.ru Assumption Set.
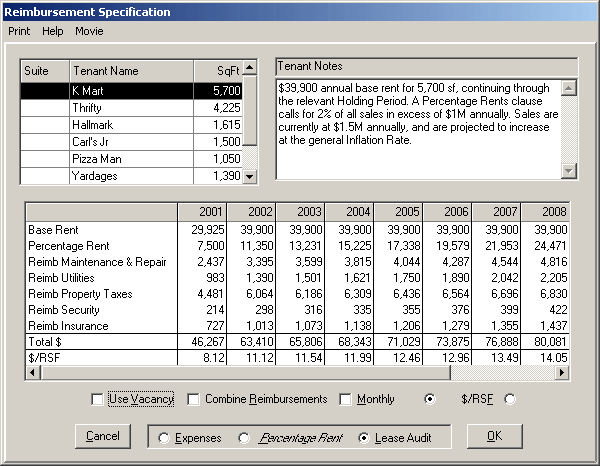
Lease Audit View When you choose the Lease Audit View, the Lease Audit Grid for the tenant currently chosen in the Tenant List is shown in the lower portion of the Dialog, as displayed here. Clicking on another tenant in the Tenant List displays the Lease Audit for that tenant. Here we are displaying a Lease Audit View for the K Mart tenant in the shops.ru Assumption Set. Below the Lease Audit Grid, the following controls allow you to customize your view of the Lease Audit Grid.
Use Vacancy - this checkbox allows you to toggle between using the Vacancy factor for the tenant and not. Since all computations in planEASe (other than optionally in Lease Analysis) use Vacancy, this should be checked if you want the results to agree with other planEASe reporting.
Combine Reimbursements - this checkbox allows you to toggle between showing the reimbursed expenses individually or combining them into one line.
Monthly - if you have purchased the optional Monthly Extension , this checkbox allows you to toggle between Monthly and Annual Views of the Audit.
$ or $/RSF - these option buttons allow you to choose whether the Grid amounts are shown as Dollars or as Dollars/RSF.
Physical Occupancy The calculation of Expense Reimbursements, and Gross Up of expenses with the Expense Variable assumption specified as greater than zero requires that planEASe compute and track the Physical Occupancy of the entire property, as well as the Physical Occupancy of each individual space. The Physical Occupancy of any space at any time within planEASe is defined as the space entered as RSF in the Revenue Calculator on the first (Base Rent) page for the lease, times the General Credit Loss and Vacancy on the Investor’s Page PLUS the Vacancy Factor entered on that Revenue Page (or following Continuation Pages for different later times) divided by the RSF in the Revenue Calculator on the first (Base Rent) page for the lease. Thus, for any individual lease, Physical Occupancy at any time is the space RSF times the sum of the two Vacancy Factors applying to that time, divided by the constant space RSF specified on the first Revenue Page for that space. The allowance for varying Vacancy Factors for individual spaces through the use of Continuation Pages allows for reimbursement of expenses during lease-up as well as dark time between leases.
The Physical Occupancy for the entire property is simply the sum of the Property Occupancy for the individual spaces. Note that in this case, the denominator for Property Occupancy may be varied by planning additional space added after acquisition or subtracting space due, perhaps, to a Partial Sale.
These definitions of Physical Occupancy have major implications you should consider and allow for when entering your Assumptions for leases:
! When planning the lease for any space, you must use the SqFt Calculator for (at least) the first Revenue Page, or the Lease will NOT be included in the Tenant List (or the calculations of Physical Occupancy). ! It is absolutely essential that you plan all spaces for the entire length of the Holding Period (including all extensions used by Sensitivity and Risk Analyses). If you fail to include a plan for any space, planEASe
assumes it no longer exists, and allocates reimbursements across the smaller space implied, therefore mis-stating the reimbursements. This means you must plan a vacant space as 100% vacant during the time it is vacant. ! If further Revenue Pages are necessary to describe changes in Base Rent during the lease, they MUST be Continuation Pages so that planEASe can add the planned Revenue Periods to the calculations of Physical Occupancy. ! Dark periods between leases can be handled either by planning the time as a Continuation Page with a 100% Vacancy Factor, or by entering a new lease starting as 100% vacant for the dark period. The first method continues the revenue stream under the old tenant name, whereas the second allows you to specify a new tenant name. In EITHER case, the time periods must be continuous, or the Physical Occupancy will be mis-stated, resulting in wrong reimbursement amounts ! Revenues for items other than leases to be included in the reimbursement specifications should NOT use the Revenue Calculator on the first Revenue Page for the item.
Tenant Reimbursement Alarms
Tenant Reimbursement Alarms indicate that you should examine the plan for a particular Tenant's space closely, because it violates one or more of the rules above. The fact that an alarm is on does NOT mean any calculations are affected. Rather, the alarm is meant to direct your attention to the plan for the space, which may be correct.
In the Expenses View of the Reimbursement Dialog, whenever a Space's Occupancy Plan begins after the Acquisition Date, the Tenant's row in the Tenant grid is colored YELLOW to notify you of that fact. Of course, in Development projects, it is totally normal that space occupancy for at least a few of the spaces would begin after acquisition, and there are other reasons for this, such as changing Tenants during the Holding Period. In other words, the yellow color represents just a warnin g that you should consider whether the planned situation is correct or not.
Whenever a Space's Occupancy Plan is interrupted after it begins and before the end of the Holding Period, the Tenant's row in the Tenant grid is colored RED to notify you of the fact. While this is not normal, it can certainly be valid in the case of a Partial Sale or a combination of two or more spaces into one (or a splitting of one space into two or more). In other words, red is simply a different kind of warning that you should evaluate the space plan. Additionally, a tenant will be colored RED if the first page for the tenant ends before the Acquisition Date, which is always wrong.
The Alarms On checkbox at the bottom left of the Dialog allows you to turn the alarms off (and on). If you turn them off, they will remain off while you are processing the current Assumption Set. When you process another Assumption Set, or begin another session they are turned on by default.