Assumption Editing
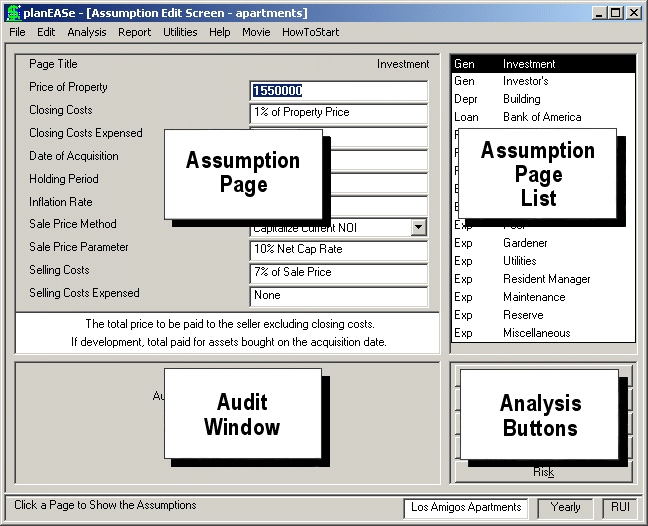
The first thing you will see when you activate planEASe is this Assumption Edit Screen. In planEASe, the Assumption Set is a fundamental concept. The Assumption Set is to planEASe what a WorkSheet is to a Spreadsheet program, or what a Document is to a word processing program. That is, in a word processor, the Document is the thing you edit and process. In a spreadsheet, it’s the WorkSheet, and in planEASe it’s the Assumption Set. Just as you open and save Documents in the word processor, you open and save Assumption Sets in planEASe.
Here the Assumption Set is the Los Amigos Apartments (as noted in the status bar at the bottom of the screen). This is an Assumption Set included on the system disk saved under the name Apartments.ru. A planEASe Assumption Set consists of all the assumptions you have entered for a particular property or analysis. You can think of an Assumption Set as a “Notebook” full of Assumption Pages. The first page, “Investment Assumptions”, is displayed here. A Real Estate Investment Analysis Assumption Set consists of:
- 1. One Investment Assumptions page
- 2. One Investor’s Assumptions page
- 3. Many Depreciation Assumptions pages (there is one here, named “Building”)
- 4. Many Loan Assumptions pages (there is one here, named “New First Loan”)
- 5. Many Revenue Assumptions pages (there are four here, named “1 Bedroom Units”, etc.)
- 6. Many Expense Assumptions pages (there are many here, named “Resident Manager”, etc.)
where Many is any number you want (these pages shown with Many are therefore called multiple pages). As with a notebook, you may insert new pages for any of the multiple pages, and also remove them. Also like a notebook, you may easily access any page without paging through the intervening pages. For these reasons, planEASe adapts easily to the normal procedure of beginning the investigation of a property with few details (pages), and then expanding the detail of the analysis as more information in regard to the investment is gathered in the investigation process.
The Assumption Edit Screen is divided into four major rectangles and three window-wide bars:
Assumption Page List (showing the names of your pages, at the top right) Assumption Page (showing the contents of each page, at the top left) Audit Window (showing the computed results of the current Assumption Page, at the bottom left), and Analysis Buttons (allowing you to go to the various analysis function, at the bottom right) Title Bar (at the very top of planEASe, now saying “planEASe - Assumption Edit Screen...”) Menu Bar (below the Title Bar, now saying “F ile Edit Analysis...”) Status Bar (at the very bottom of planEASe, showing “Yearly” and “RUI” on the right side)
Assumption Page List There are many pages in an Assumption Set. The Assumption Page List shows the list of pages in the current Assumption Set (Notebook) and allows you to control which Assumption Page is being displayed. The highlighted name in this list identifies the page currently displayed in the Assumption Page (to the left of the Assumption Page List). You can display the other pages in the list simply by clicking on the page name in the list. You also may use M and W to display the prior and following pages in the list. c - W and c - M display the first page of the prior or next Page Type. c - h and c - e highlight and display the first and last pages in the list. Typing a new Page Title in the displayed Assumption Page changes the title in the Assumption Page List.
To Add, Delete, Clone, Cut, Copy, and Paste Assumption Pages, click the Edit Menu in the Menu Bar. You may use as many Assumption Pages as you want to fully describe all the Assets, Loans, Revenues and Expenses for a property.
Assumption Page The Assumption Page (to the left of the Assumption Page List) allows you to edit/change the assumption values in the currently displayed page. You may display other assumption pages by clicking on the name of the page you want to display (in the Assumption Page List). To change an assumption value in the displayed page, just click on it and enter the new value. Of course, you also may use u, d and / to highlight and edit assumptions values.
At the bottom of the Assumption Page is a two line Assumption Help message. Whenever you highlight an assumption value, this area shows a short help message describing the assumption. If you need more extensive help, doubleclick on the Assumption Help and full assumption help will appear.
Audit Window Below the Assumptions, on the left side of the screen, is the Audit Window. Whenever you are displaying one of the multiple assumption pages (Depreciation, Loan, Revenue and Expense Assumption pages are called multiple because you may include as many of each of them as you want for a property), the Audit Window shows the cash flow projection for the projected item. For instance, if you click on a loan page in the page list, the loan assumptions are shown, and the Audit Window displays the loan projection based on those assumptions. Doubleclick the Audit Window area to expand it for easier viewing. The Audit Window, like everything else in planEASe, is kept current as you change assumptions. When entering new assumptions, you may want to turn the Audit Window off (uncheck Auto-Audit in the Analysis Menu).
Toward the upper right of the Audit Window there is a Notes/Audit button that allows you to view and edit any Notes attached to the Assumption Page. If the word Notes on the button is in italics, there are Notes attached to the Assumption Page. The lack of italics, then, means no Notes are present. While viewing Notes, the Notes/Audit button is renamed to Audit to allow you to toggle between viewing the Notes and the Audit.
Analysis Buttons These buttons offer easy access to the first five analysis functions of planEASe: Basic, Detail, Lease, Sensitivity, and Risk (see the discussion of the Menu Bar below).
Title Bar At the top of planEASe is the Title Bar, which tells you the function you are performing. When you are at the Assumption Edit Screen, it also shows you the filename for the current Assumption Set. Some functions (like Utilities/Cash Flow Analysis ) also allow you to edit/save files, and when you are at them, the current file name is displayed here.
Menu Bar planEASe can be thought of as the Assumption Edit Screen being the hub of a wheel with spokes leading to the other functions:
Analysis Menu: Basic, Detail, Lease, Sensitivity, and Risk Analysis are here (and on the Analysis Buttons) Reports Menu: APOD, Acquisition, Sale, Income and Annual Statements, Rent Roll and Assumption Reports, and TitlePages Utilities Menu: Cash Flow Analysis, Interest Rates, Loan Planner, Loan Amortization, Depreciation and Exchange Recap
To reach any of these 19 spoke functions, just request it from the Menu Bar at the top of the Assumption Edit Screen. To return from any spoke, press ` or the Exit Button with the mouse (or a - X), or pull down the File/Exit (or Print/Exit) Menu Option in the spoke, any of which will return you to the hub Assumption Edit Screen.
Each entry on all of the menu choices is documented (in order of appearance) in the following pages. See the Table of Contents or Index to locate the choice desired.
Status Bar The Status Bar at the bottom of planEASe tells you four things:
Model is located at the far right of the Status Bar. Normally RUI, the current model can be changed by requesting File/Switch Models.
Mode is next to Model, showing whether you are in the Monthly, Quarterly or Yearly projection mode. Monthly and Quarterly projection modes are available by requesting Analysis / Monthly or Analysis / Quarterly (if you have purchased the optional Monthly Extension ).
Investment Name is the Investment Name you have entered for the Assumption Set. You initially enter this when you request File/New Assumptions . After that, you may edit it by clicking directly on it.
Live Help Message is shown at the Left edge of the Status Bar. In planEASe, any white area of the screen is actionable --- that means if you click or doubleclick on it something will happen. The live help message you see in this area, in general, tells you what will happen if you click in the white area currently under your mouse. To see this in action, simply move your mouse around the white areas on the screen and watch the Live Help Message change. This is only one of the many planEASe help capabilities discussed on page 64.